· Marguerite Aubin
How to Use a Yarn Swift, Step by Step
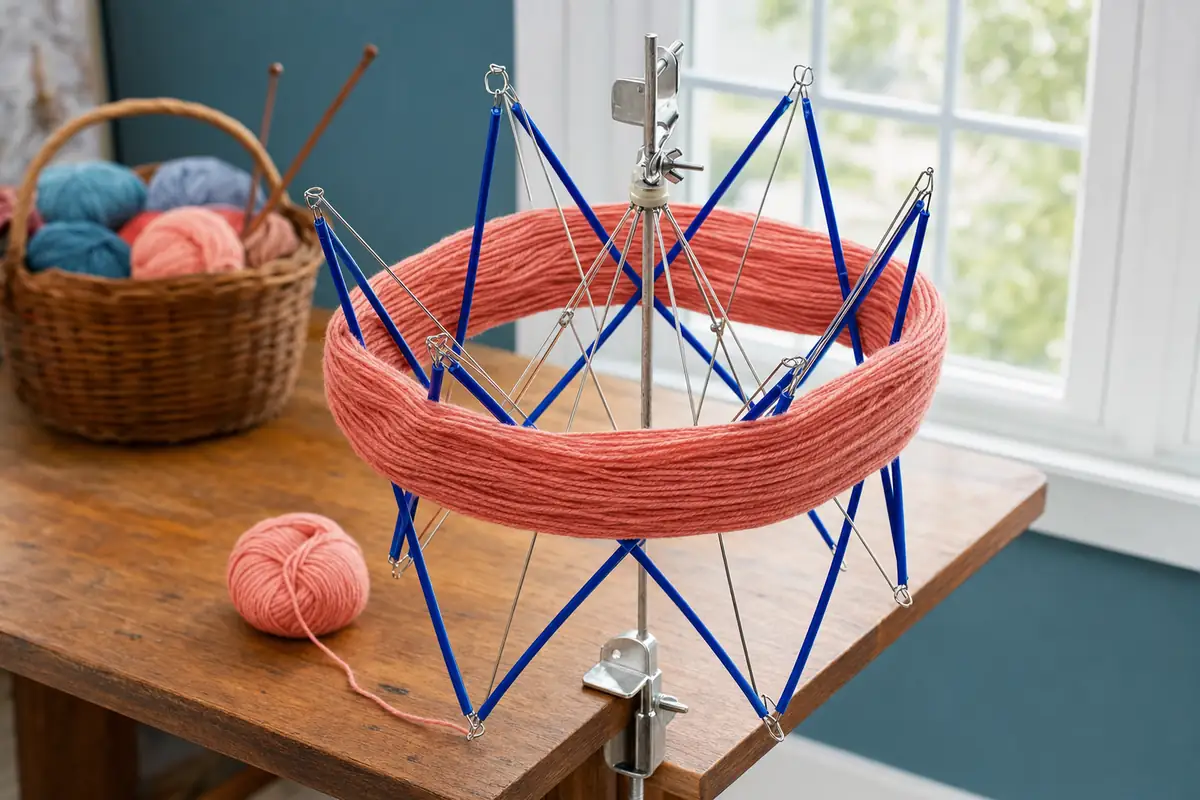
A swift looks like an upside down umbrella because that is exactly the shape the job needs. A skein of yarn is one very long loop twisted into a tidy bundle, and the moment you untwist it you are holding a circle of yarn that would rather collapse into a knot. The swift keeps that circle open and lets it rotate freely, so the yarn leaves the loop in the same order it went in. Everything below describes the Skeinwright umbrella swift, and the sequence is the same for any umbrella style swift you might already own.
If you are not yet sure whether you need one at all, start with our plain-English explainer on what a yarn swift is, then come back here for the handling.
Step 1: Clamp it to something that will not move
The clamp is the part most people rush, and it is the part that decides whether the next ten minutes are calm or annoying. Our swift mounts on a screw clamp that bites onto a table edge. It is happiest on a flat lip of solid wood, a kitchen table, a desk or a sturdy work surface with a rim you can actually reach around.
Round edges, thick padded rims, glass tops and drop-leaf tables all reduce the bite. If that is all you have, slide a thin scrap of wood between the clamp jaw and the table so the pressure spreads across a flat face rather than a curve. Several buyers have told us the clamp casting is the least refined part of the tool, and that is a fair comment rather than a defect. Give the screw an extra half turn once the swift is upright, then push the frame sideways with one hand. If the whole assembly shifts, tighten again or move to a better edge.
Leave headroom as well. The frame stands 16.54 in (42 cm) tall, so a low shelf directly above the table edge will get in the way of the arms once they open.
Diameter of the swift when the umbrella is fully open (55 cm)
— Skeinwright published specification sheet, 2026
Step 2: Open the umbrella to match your skein
The swift opens the same way an umbrella does. Slide the collar up the central post and the arms swing outward until the frame reaches its full spread of 21.65 in (55 cm) across. You do not have to run it wide open every time. Most commercial skeins are shorter loops than that, so you set the collar at whatever height makes the loop sit taut without stretching.
Snug is the target, not tight. A skein pulled hard against the arms fights the winder and can distort springy wool. A skein hanging loose will slip off the arms halfway through and drop into your lap. Aim for a loop that keeps its round shape when you tap it with a finger.
One note on measurements. The frame is measured by hand, with a stated tolerance of 1 to 3 cm, which is roughly 0.4 to 1.2 in. The number on the spec sheet is a working figure rather than a laboratory reading, and the tolerance is published right beside it. You can read the full dimensions on the product page.
Stated measurement tolerance for the folding frame
— Skeinwright published specification sheet, 2026
Step 3: Load the skein and find the working end
Take the skein out of its band and untwist it into a plain circle. Most skeins are held together by one or two ties of contrasting waste yarn, often in a figure eight that keeps the strands sorted. Do not cut those ties yet. Drape the whole circle over the open arms first, spread it evenly so no section bunches up, and only then snip the ties with small scissors.
Now look for the ends. A well wound skein gives you two, usually tucked into the body of the loop near a tie. Take the one that pulls away cleanly, and if a tail refuses to come free without dragging a neighbor with it, try the other end instead. Fighting a stubborn end is the single most common way a skein turns into a bird nest.
Give the frame a gentle spin by hand before you wind anything. It should coast for a moment and stop softly. If it grinds or catches, the collar is probably still gripping the post, so ease it down a fraction.
Step 4: Wind the ball
A swift on its own does not make a ball. It presents the yarn, and something else has to take it up. That something is usually a hand crank ball winder clamped to the same table, roughly two to three feet away from the swift so the yarn travels in a straight, gentle line.
Thread the end through the winder guide, wrap it a few turns around the spindle to anchor it, then crank at a steady walking pace. The pull of the winder is what turns the swift, which is why the swift has to spin easily. Watch the yarn rather than the crank. If a loop lifts off an arm, stop, lift it back and carry on. If the strand goes slack, you are cranking faster than the swift can follow, so slow down.
When the last yard leaves the arms, hold the tail for a second before it whips around the spindle, then lift your finished cake straight up and off. Our full walkthrough of the winding half of the job lives in how to wind a skein of yarn, and if you are still choosing a winder, the ball winder buying guide covers what actually matters.
What to do when something goes wrong
Almost every problem with a swift comes down to one of five things, and none of them need a repair kit.
| What you see | Most likely cause | Fix |
|---|---|---|
| The swift walks across the table | Clamp is on a rounded or padded edge | Move to a flat lip, or pad the jaw with flat scrap wood |
| Loops slide off the arms | Umbrella opened too narrow for the skein | Raise the collar until the loop sits snug |
| Yarn stretches and springs back | Umbrella opened too wide | Lower the collar a notch and re-seat the loop |
| The frame refuses to coast | Collar still pinching the central post | Ease the collar down slightly and spin by hand to check |
| Two strands come off together | Wrong end pulled, or ties cut before spreading | Stop, free the crossing strand by hand, switch ends |
Fold the frame flat when you are done. That is the whole point of an umbrella swift over a fixed wooden one, and it is the reason ours lives in a drawer rather than on a shelf. If you want the argument for and against each style, we set it out in wooden versus metal yarn swifts, and the case against chair backs and helpful relatives is in swift alternatives compared.
How long it takes once you have the habit
The first skein is slow because you are learning where the tension lives. By the third, the whole routine is muscle memory: clamp, open, drape, snip, thread, crank. Knitters who wind several skeins in one sitting tend to set both tools up on the table and leave them there, which is exactly what the swift and winder set is for.
Twenty six verified buyers have rated the swift so far, and the pattern in their comments is consistent. The tool does the job at a price that does not sting, and the clamp rewards a careful hand. You can read the comments on our reviews page, or browse the rest of our guides and the Skeinwright home page.
Average across 26 verified buyer ratings of the umbrella swift
— Skeinwright verified buyer ratings, 2026